Blackberry Tie-Dye
Blackberries aren’t just for eating…
Don’t get me wrong – I am NOT a natural ‘crafter’. Some people create the most amazing crafting projects with their children and I always wonder how they do it, and where do they find the time!? When attempted, our craft projects always fail, dismally! So it was with trepidation that I decided to give blackberry tie-dye a go. Turns out, it’s a pretty cool Autumn activity for the family! Who knew?
It was the end of blackberry season. The time when they’ve mostly lost their deliciousness and become all mushy. In the spirit of waste not want not, we decided to find a use for these sorry-looking berries and give our old, somewhat manky white pillow cases a new lease of blackberry life.
This is our blackberry tie-dye ‘how-to’, but there are many methods on the internet and I’m not entirely convinced this is the most effective BUT it was easy, fun and it did the job so good enough for us!
Blackberry tie-dye,
The method:
Step 1: Pick
On a sunny afternoon after school, we went and picked the blackberries. This was a challenge with 2 small, hungry children. Their strategy was ‘1 for the pot, 10 for me’… then, inevitably, they got bored and ran around with sticks whilst I did all the hard, picking grafting. We got a fair few handfuls but I don’t think it really matters about quantities.

Step 2: Boil
Boil the pillow cases in water with a heap of salt and a splash of vinegar. This helps to make the colour set once they’re dyed. The house was all steamy and smelt like a launderette after this.
Step 3: Tie
Once the pillow cases have cooled down, wring out most of the water and get the kids to tie elastic bands all over them. This will make the patterns. They need to be tight so you might need to help on this bit. As a little tip, I only managed to find 2 elastic bands from some manky old spring onion bunches but luckily remembered the stash of loom bands tucked away in a cupboard. Otherwise it would have had to be my hair-tyes.

Step 4: Cook
Meanwhile, boil up the blackberries in some water for about an hour. I don’t know exact measurements, I just guessed at what would vaguely cover the pillow cases.
Step 5: Dye
Dip the pillow cases in the blackberries – please note the mixture will be hot so supervise the kids and use tongs. Make sure the pillow case is good and covered. You could even soak it in there for a while but, frankly, we’d all had enough by now so a quick dip it was.

Step 6: Dry
Leave to dry. We put the pillow cases on a grill tray because it drips. It took about 3 days to dry.
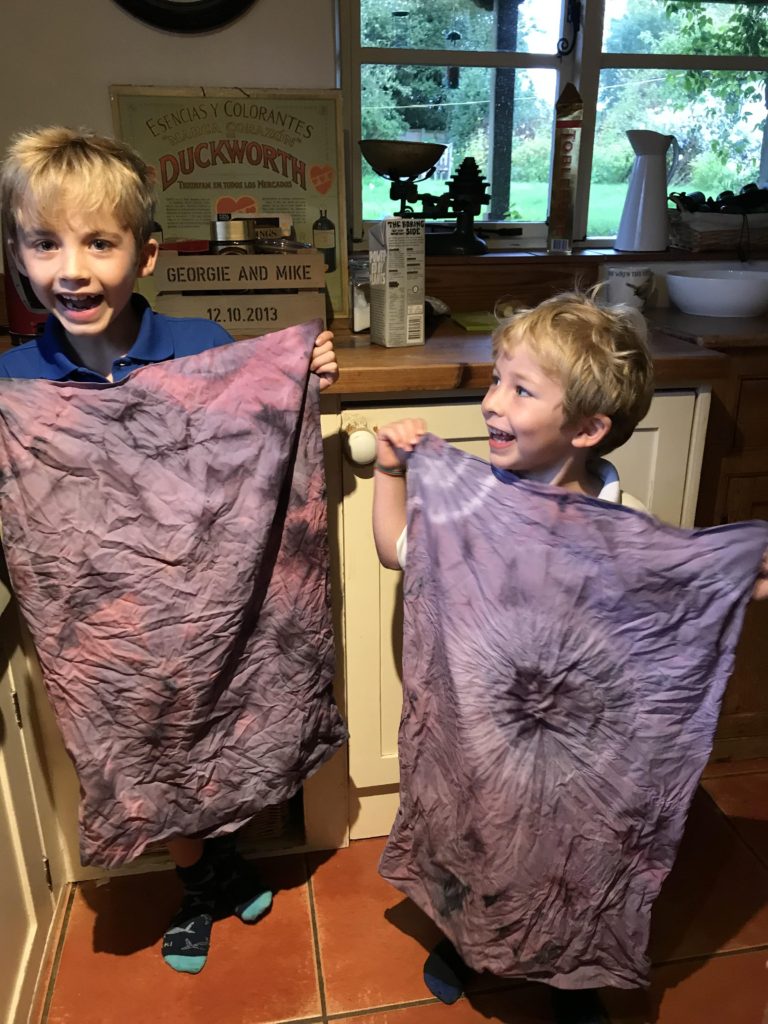
Step 7: The reveal
Take out the elastic bands and all ooooo and aaaaaaah at the awesome patterns in the purple pillow cases.
Step 8: Wash
Wash in washing machine. We were slightly surprised that the pillow cases came out a sort of light blueberry – grey but it was actually quite cool and the patterns were very clear.
The boys now have their pillow cases on their beds and we’re all actually pretty chuffed with the results (me especially!)

Blackberries are more than just a nice little berry. Read more about them and their value in the eco-system on the woodland trust site.
Looking for more family Autumn activities? Check out our guide to cooking outdoors here. Or more awesome mini-adventures here.